Beginner Embroidery Craft Tutorial – Craft Supply Collection Kit
Share
Embroidery has become one of my favorite hobbies because it has the perfect amount of repetition to keep my hands busy while being small enough to take with me almost anywhere. As we move through the steps, it may seem like the majority of embroidery is prep work plus untangling knots in your thread, but once all your prep is complete, the stitching is fun and relaxing.
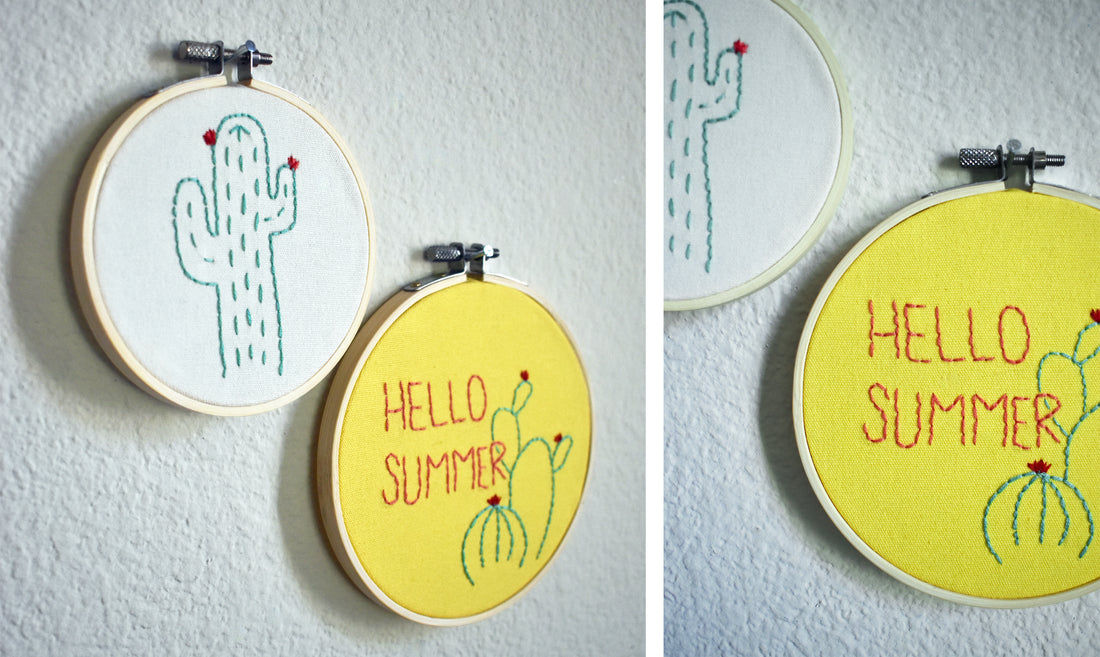
In this craft tutorial, we focus on setting the fabric in your hoop and a few basic stitches that are great for any beginner crafter and will leave you with a finished piece of artwork!
Supplies:
- Handmade Modern Craft Supply Collection includes:
- 8” x 8” Fabric Squares
- Embroidery Thread
- Sewing Needle
- Wooden Embroidery Hoop
Tools:
- Scissors
- Hot Glue Gun
- Pencil
- White or Light-colored Eraser

Step 1: To begin your embroidery, take your wooden embroidery hoop, up to a 6” diameter hoop will work best when you select your fabric square from the Handmade Modern Craft Supply Collection. Loosen the tightening mechanism at the top of the hoop and separate the two hoops.
Step 2: Place the simple hoop on your tabletop and put your fabric on top, then place your second half of your hoop on top of the fabric. Line up your hoops and be sure your top hoop is loose enough to gently press it down to sandwich the fabric between the two hoops.
Step 3: Begin tightening the hoop by twisting the mechanism to make the fabric taut inside. Pull the edges of the fabric lightly and evenly on all sides as you tighten the hoops to create tension on the fabric. If you feel your fabric is beginning to stretch or distort, loosen your hoops enough to keep your fabric tight yet not strained.
Step 4: Now that your fabric is set, it’s time to start your design with a pencil sketch. Using a standard pencil, draw a light-handed sketch to easily follow with your stitches, in this case we drew a cactus shape on one embroidery and wrote out letters with a cactus on the other. Use painter’s tape or a metal ruler to keep your lettering straight and level. Also, you should be able to easily erase any pencil lines if you make a mistake in your sketch, having a light-colored eraser is a great tip to be sure it doesn’t leave any residue on your fabric.
Step 5: To prep your embroidery thread, cut a 2-3’ length of thread in the color of your choice and separate the thread into 2 pieces. Standard embroidery thread is comprised of 6 individual threads and we want to separate it into 2 lengths of 3 threads for a more delicate looking stitch.
Step 6: Next, start your embroidery at one end of your design and puncture your fabric from the back to the front. Be sure to hold onto your thread at the back so you don’t pull the thread all the way out. Holding onto about an inch or less of thread on the back, move your needle up 1/8” – 1/4” on your sketch and puncture your fabric pushing your needle to the backside again.
Step 7: Follow that same step on the back, moving up approximately 1/8” (attempting to keep each stitch the same length) and push your needle back to the front.
Step 8: Once you have 2-3 stitches on the front in this fashion, it’s time to back stitch to lock your thread in place before moving throughout the entire piece. To back stitch, take your needle that should be on the front of your fabric and backtrack on your stitch pattern to connect the stitches.
Step 9: Once you’ve connected all the stitches on the front, you can give your starting thread a little tug to be sure it can’t be pulled out and then you can start stitching the rest of your design. To continue, follow the same techniques of creating 1 stitch forward on the front, followed by 1 stitch forward on the back and connecting the 2 on the front again.
Step 10: When you’re close to running out of the thread or have finished stitching, pull your needle and thread underneath a stitch on the back of your hoop, then create a loop with your remaining thread and pull your needle through to make a knot. Cut off the remaining thread and start the steps over again to continue your design.
Step 11: As you finish your embroidery, it comes time to add some finishing details to make your new artwork feel complete. To keep your embroidery in the hoop as an adorable and easy way to make framed artwork, cut off the excess fabric around the perimeter of the hoop leaving a 1” border of fabric remaining.
Step 12: Turn your embroidery over and using a glue gun, glue the excess fabric to the inside edge of the wooden hoop. Gently fold over the fabric in small increments as you glue to wrap the embroidery hoop and create a clean edge.

Your handmade embroideries are finished and they’re even ready to hang! Rather you’re creating these custom pieces for your own home or personalized them as a gift, they will be a happy reminder of your new favorite hobby!
Thanks for crafting with me and Handmade Modern! We want to see your finished art projects. Post on social media what you created and tag us using the hashtags #handmademodern #gomakestuff

This post is by fiber artist and craft enthusiast Tessa Anderstrom, the owner of handmade shop Studio Jane which focuses on sustainably made home décor and handmade art. As an avid DIYer with a passion for learning new skills, Tessa enjoys sharing that knowledge with crafters of all ages.
