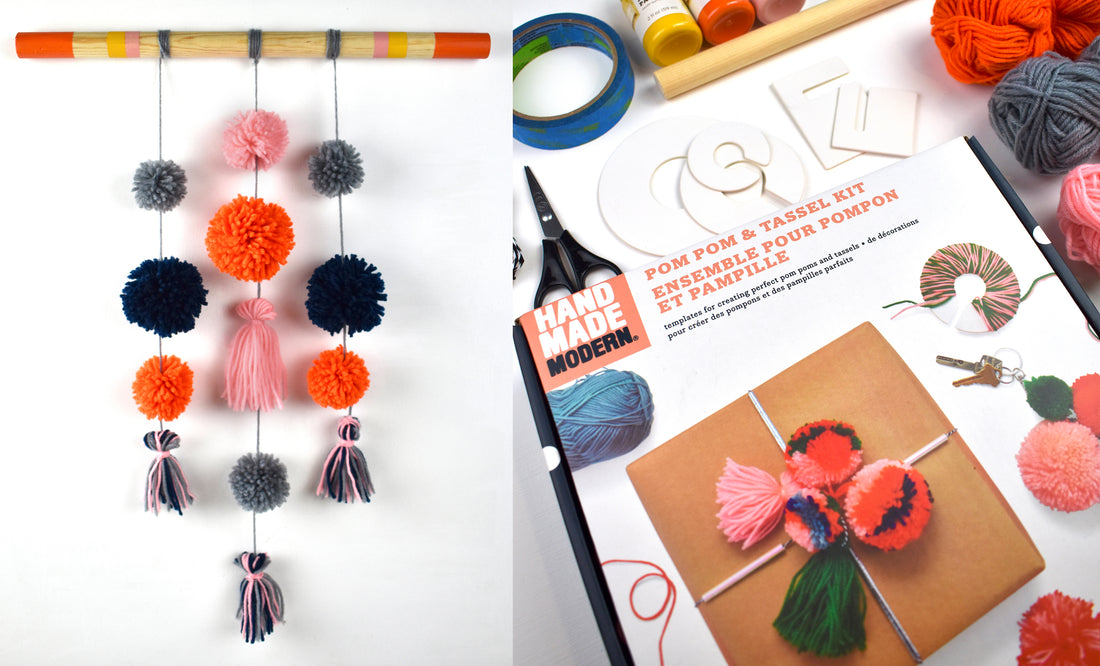
DIY Pom Pom + Tassel Wall Hanging
Share
Yarn is one of my favorite craft supplies, the possibilities are endless, and pom poms and tassels are my go-to item to add to a variety of projects! Keychains, gift toppers, garlands, and more are perfect ways to use poms and tassels. For today, we’ll be creating pom poms and tassels in numerous colors to create a wall hanging featuring a painted wooden dowel. I selected a punchy color palette with pops of bright orange yarn and carried that same color palette into the painted details on the dowel, but feel free to make your wall hanging in any shades to coordinate with your room.
We’ll be using the Handmade Modern Pom Pom and Tassel Kit to craft with; it’s the perfect set to get you started on making these simple handmade items; once you get the hang of it, they’re simple and fun to craft!
Supplies:
- Handmade Modern Pom Pom + Tassel Kit includes:
- Yarn in a variety of colors
- Pom Pom Templates
- Tassel Templates
- Twine
- Sewing Needle
- Scissors
- Wooden Dowel
- Paint
- Painter’s Tape

Step 1: To start your wall hanging, begin with painting the wooden dowel. Use the painter’s tape to create stripes on both ends of the dowel for clean paint lines. Set the dowel aside to let it dry and get started on the yarn elements.
Step 2: Make a pom pom first; using the circular C templates that come in three different sizes, select the size you’d like for your pom pom. Holding your yarn and template together in one hand, take the trailing yarn and wrap it around the template by pulling the yarn into the gap of the template and around repeatedly until the template has a thick chunk of yarn on 2/3 of the C shape.
Step 3: Now that your template is full, cut along the outer edge of the template while making sure the yarn stays in the center of the template. Once all the yarn is cut, take an additional piece of yarn, and tie it around the center of the yarn, creating a tight center with a poof of yarn on either side of the template. Now pull the template off the pom pom and trim any longer pieces of yarn to make an even fluff ball of yarn.
Continue the same steps to make multiple pom poms in varying sizes. To create a similar wall hanging, I made six small and three large pom poms.
Step 4: Next up is making a tassel; use the rectangular template in the kit to create three different sizes of tassels. Holding the template in one hand, add a strand of yarn in the same hand, holding it against the bottom of the template (the top of the template has the cut out in it). Wrap the yarn around the outer edge of the template from bottom to top and around the bottom again, continue wrapping it around the template multiple times to create a thick wrap of yarn.
You can use multiple colors by holding multiple strands of yarn at the same time and follow the same technique.
Step 5: Once you’re finished wrapping the template, cut the yarn and tuck the tail of the yarn into the wrapped chunk of yarn. Cut a 6” piece of additional yarn and slide it under the wrapped portion, to be in the center of the wrap. Pull the yarn to the top and tie a double knot around the chunk of yarn.

Step 6: Using the cut out at the top of the template, take another piece of yarn, and wrap it around both sides of the wrapped portion of yarn and tie a knot to hold all the yarn together, creating a “neck” on your tassel.
You can wrap it around multiple times to create a longer “neck” on your tassel, depending on the style of tassel you’re making.
Step 7: Slide the tassel off the template and cut the yarn at the bottom to separate the yarn on only one end. Trim the loose end of the tassel to make the yarn even.
Continue the same steps to make multiple tassels in varying sizes. To create a similar wall hanging, I made 3 medium and 1 large tassel.
Step 8: Arrange your poms and tassels into a composition on your workspace that will feature multiple vertical strands. Then cut strands of yarn that measure 2’-3’ in length, one for each vertical strand you added in your composition; our sample is comprised of 3. Take each piece of yarn and thread the eye of the sewing needle with it and tie a knot at the other end.
Step 9: Start from the bottom of each line, string all the yarn elements on the strand of the yarn. Push your needle through the bottom of a tassel and the center of a pom pom. Once the strand is complete, tie the excess yarn around the wooden dowel.
For a similar style, hang the center strand lower to create a triangular style in your wall hanging. After all your strands are tied to the dowel, your new bohemian wall hanging is complete!

Now that you’ve learned how to create pom poms and tassels, you can make countless projects to adorn your home and craft handmade gifts that will make everyone in your life feel special!
Thanks for crafting with me and Handmade Modern! We want to see your finished art projects. Post on social media what you created and tag us using the hashtags #handmademodern #gomakestuff

