DIY Santa Rocket Ship - STEAM Activity
Share
“Alert! You have an incoming message! Santa’s sleigh broke and we need your help building him a rocket to get the presents delivered on time for Christmas morning!”
This is the scenario I gave my daughter when we sat down with the Kid Made Modern Christmas Craft Kit. My daughter sometimes has a tough time with open-ended crafting. When anything is possible, it just feels too overwhelming to start. By giving her a goal, she can narrow in her focus and use her creativity on finding a solution and working out the details. Her eyes lit up as we opened the box.

Supplies Needed:
- Kid Made Modern Christmas Craft Kit
- Cardboard tube(s)
- Scissors
- Markers
- Pencil
- Low Temp glue gun (optional, but very helpful)

Inside the kit you’ll find all kinds of goodies, though you might have a hard time finding “rocket” supplies. That’s where creativity and a solution-focused mindset comes into play! I’ll share some of our ideas that we came up with, but feel free to come up with your own ideas! There are so many neat possibilities with this activity.
So, to continue to focus her efforts, as she looked through the materials, I had her start thinking about some of the components of a rocket. Here’s what we came up with.
- Rocket’s body (we’ll use the cardboard tube for this)
- Cone at the top of the rocket
- Wings (usually triangle shaped)
- A window would be cool!
- And of course it has to be holiday-themed!
Instructions:
Step 1
Rocket Body and Window
As I mentioned above, we used a cardboard tube as the body of the rocket.
We opened the sequin bag, and we found some large blue-tinted clear oval sequins – this would be PERFECT for our window!

So, I traced the shape of the sequin onto the cardboard tube, and then I carefully cut out a window in the tube for her (making sure where I cut was smaller than the tracing to ensure the window could be glued to the inside of the tube later).

My daughter then got right to work decorating the tube with holiday colored markers.

My daughter wanted to have Santa inside the window, so I had her draw a small Santa (I traced the sequin first on her drawing paper so she knew how big to make her portrait).

I then cut out the Santa for her, put a few drops of glue on her drawing and stuck it to the window. Then I put glue on the top of the sequin along the edge. I carefully slid the window into the cardboard tube and over the cut hole and held it there for a few seconds until it was stuck. Santa is onboard!
Step 2
Rocket Wings

The next part we wanted to figure out was the wings. We looked through the kit and found the felt tree, which had symmetric triangles on both sides… if we cut them just right, we’d have two wings!

We glued the wings in place with a low temp glue gun. Felt can be sort of tricky to work with using regular glue and I’m all for minimizing those types of frustrations and obstacles.
Step 3
Rocket’s Top Cone
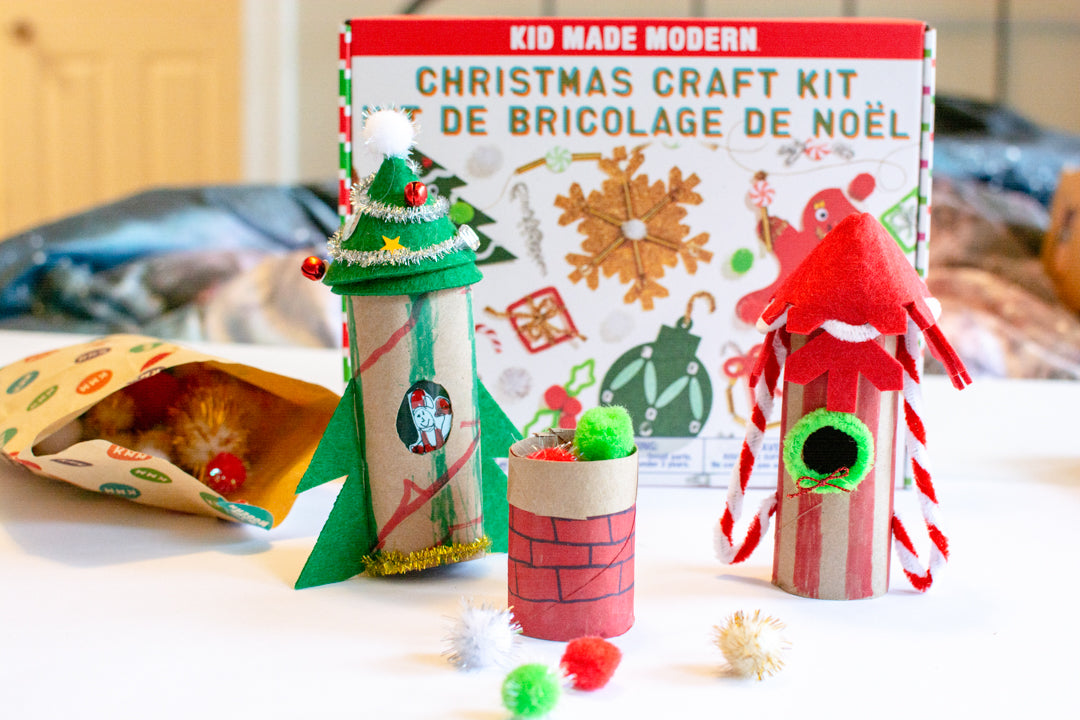
Next we needed to fashion our rocket’s top cone. This was a tricky problem for her to solve, so I showed her a trick. All we really needed to do was find a large circle. We took one of the felt ornaments and cut the top off. I then drew a line from the edge of the circle to the center and had her cut along that line. Then, all we had to do was roll/twist the felt just right, hot glue the edges together and ta-da! A cone!


And as a happy accident, the cone totally looked like a Christmas tree! So we decorated using some of the fabulous sequins and other findings from the kit.

I put a layer of hot glue on the top of the cardboard tube and then placed the cone on top. And our rocket was done!
Other Ideas

I made another rocket using the snowflake to make the cone (with a pipe cleaner to keep it rolled up instead of the hot glue) and candy-cane pipe cleaner wings (that are poked into the cardboard instead of hot glued), with a wreath around the window.

After we created our rockets, we came up with a fun game. We made a little chimney out of another cardboard tube. We then put some of the pom-poms into the rocket’s body to act as Santa’s presents. We then tried to get as many of the pom poms as we could to fall out of the rocket and into the chimney. Try it at differing heights for different levels of difficulty.
You could also use the rocket for decoration or a way to gift small presents to friends and family.
Share your holiday rocket creations with @kidmademodern! We’d love to see your STEAM creativity soar!

Mindy Baumgartner is known as the Crafty Physicist on Instagram. She loves showcasing how fun, interesting and beautiful science is through her art. She lives in Chicago with her husband, 8 year old daughter and cat.
