
Mini Tree Decorating DIY
This year, with a tiny puppy at home for the holidays, I was on the search for a mini tree to be the perfect size for him, and I have a feeling you may have some minis in need of their own tree too! If so, the Kid Made Modern Mini Christmas Tree is the ideal size for any kiddo, or puppy, in my case!

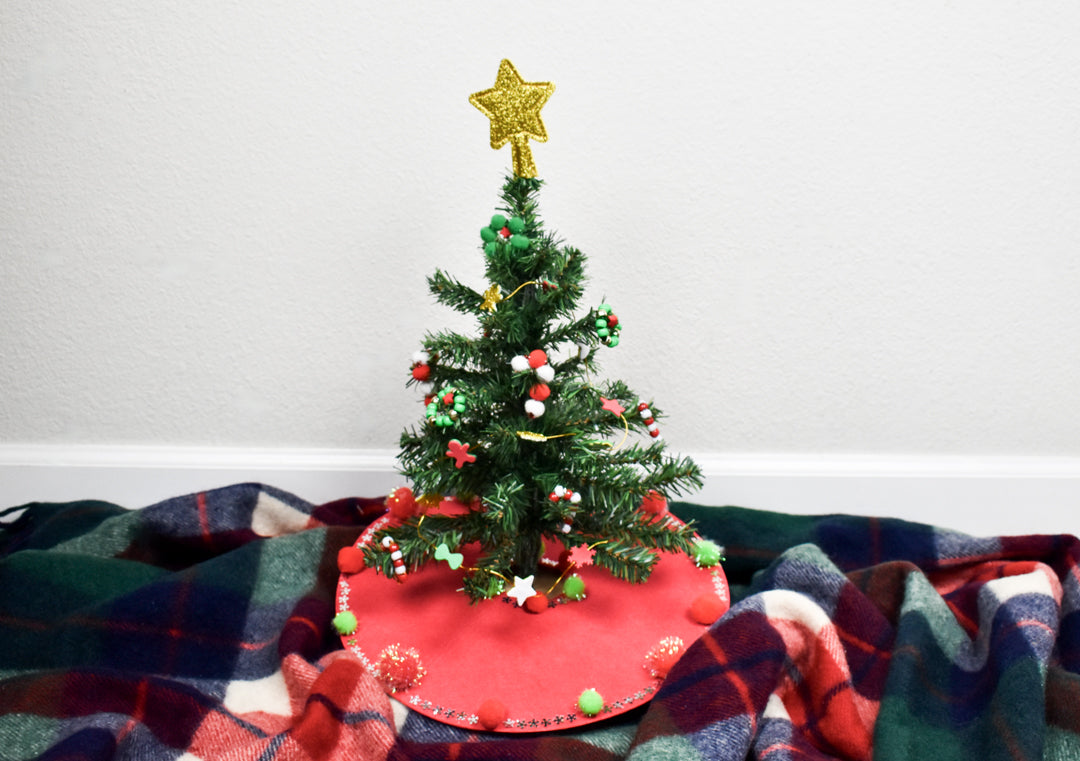
Creating custom ornaments, garlands and a tree skirt in miniature to fit this mini Christmas tree was not only so fun, but might be a new tradition to make new ornaments each year. I used a combination of supplies from the Mini Christmas Tree Kit and the Arts and Craft Library to make beaded ornaments that are a mess free craft perfect for all ages to make by hand. But my favorite part of this holiday decoration was the tree skirt, playing with texture and depth using pom poms, as well as a touch of sparkle made it eye-catching. Gluing each individual snowflake can be tedious, but spending that extra time turns a craft into an heirloom that you’ll be excited to take out every year during the holidays!

Materials Needed:
-
Kid Made Modern Mini Christmas Tree includes:
- Mini Christmas Tree
- Felt Christmas Tree Skirt
- Pom Pom Beads
- Plastic Beads
- Felt Holiday Shapes
- Snowflake Sequins
- Star Tree Topper
- Gold String
- And even more decorative elements are included!
-
Kid Made Modern Art + Crafts Library
- Pom Poms in various sizes and colors
- Fuzzy Sticks
- Scissors
- White Glue
- Glue Dots

Instructions:
Step 1
Let’s start with making our own beaded ornaments to decorate our mini tree!
Beaded Candy Cane Ornament:

To make the beaded candy cane ornament, start by beading 8 plastic red and white beads onto a fuzzy stick, alternating between both colors to create a striped candy cane.

Leave a small tip of fuzzy stick out at the top and bend it around the top bead, then curve the top of the beaded fuzzy stick down to create a cane shape.

Lastly, cut the remaining portion of the fuzzy stick off, leaving a small portion to bend onto the bead like you did with the top.
Beaded Wreath Ornament:

Next up, to craft the beaded wreath ornament, string 12 plastic, green and metallic beads onto a fuzzy stick, leaving a small portion of the fuzzy stick on both sides of the beads.

Curve the beaded fuzzy stick into a circular shape and twist the remaining portions of fuzzy stick together.

Bend the fuzzy stick down into the center of the circle and add a star bead onto it. Bend the tip of the fuzzy stick under the star to hold it in place.
Pom Pom Bead Candy Cane Ornament:

Similarly, to the first style of candy cane ornament, bead 5 red and white pom pom beads onto a fuzzy stick, alternating between the two colors to create a striped style, leaving a small portion of the fuzzy stick at the top and trim the remaining portion off the bottom.

Bend both portions of fuzzy stick onto the beads to hold them in place and curve the top into a caned shape.
Pom Pom Wreath Ornament:

Just like the plastic beaded wreath, string 6 pom pom beads onto a fuzzy stick, leaving equal portions of the fuzzy stick on both sides of the beads. Curve the beaded fuzzy stick into a circular shape and twist the remaining fuzzy stick portions together and bend down into the center of the circle. Add a red star bead onto the remaining fuzzy stick and bend the tip of the fuzzy stick onto the back of the bead to hold in place.
Step 2
Creating a custom garland for your mini tree will add a colorful and unique detail! This holiday shape garland will feature the same holiday shapes back-to-back to create double sided look when displayed on your Christmas tree.

To begin, cut 3’ of gold twine from the bundle.

Using the small holiday foam shapes, peel the paper backing from the first shape, exposing the pre-adhesive back and stick it onto the gold twine.
Take another of the same shape (Ex: two snowflakes in two different colors) and peel the paper backing, sticking it directly onto the first shape to create a double sides shape, sandwiching the twine between the two.

Continue this same method with all the foam holiday shapes every 2”-3” down the remainder of the twine.
Step 3
A Christmas tree skirt is the final detail to pull your whole mini holiday look together! To create yours, use a combination of pom poms and sequins for a sparkly and detailed Christmas style.

Select large and medium pom poms in red and green from the Arts & Crafts Library, using some standard and some metallic for varying textures.


Using 11 pom poms, space them evenly with approximately 3” between each pom and glue dot each one onto the outer edge of the felt tree skirt. Follow the same steps with medium sized pom poms, alternating between red and green around the center edge of the skirt.

Next, fill in the space between each pom pom with a row of snowflake sequins. Add a small dot of white glue and place a snowflake sequin on top, glue 6 snowflakes next to one another between each pom pom.

Follow the same steps until the inner and outer edges of the skirt are lined with snowflakes and pom poms.

Lastly, adorn the mini tree with all the new elements you just made and stare at it in all its handmade glory! Happy crafting all holiday season!

Fiber artist and craft enthusiast, Tessa Anderstrom, is the owner of handmadeshop Studio Jane which focuses on sustainably made home décor and handmade art. As an avid DIYer with a passion for learning new skills, Tessa enjoys sharing that knowledge with crafters of all ages.