Solar System Wall Hanging
Share

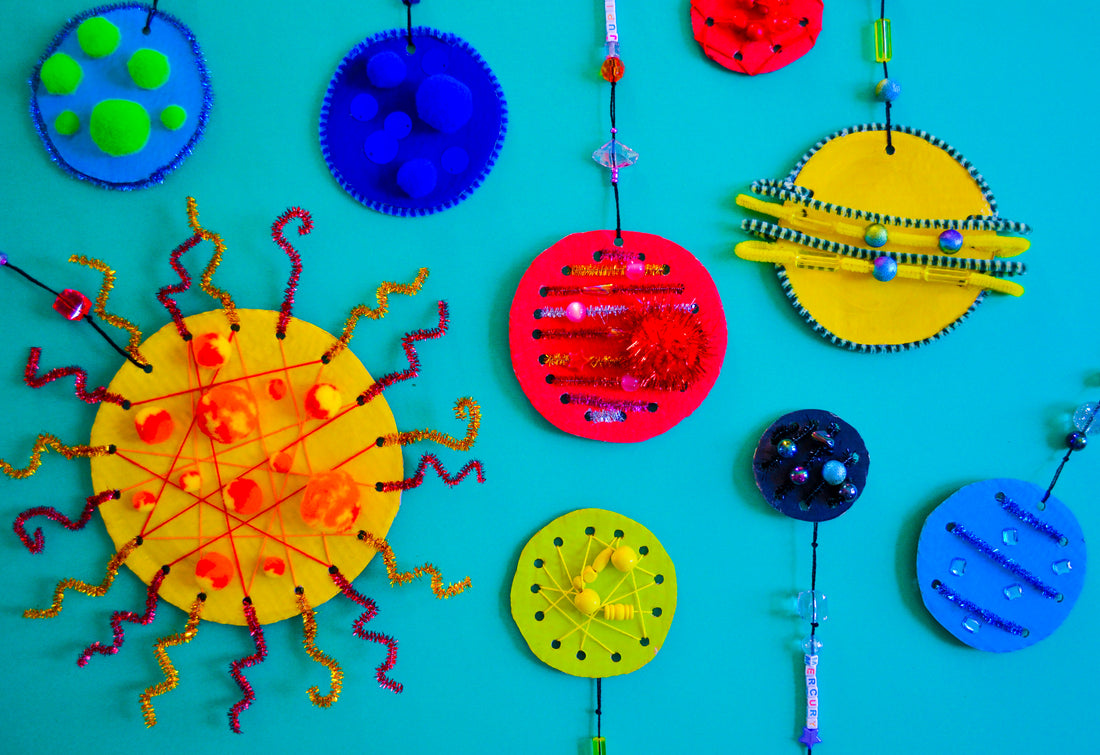
Create an out of this world solar system display using your Arts and Crafts Library! Let your creativity run wild as you make mini versions of our sun and the eight planets in our solar system. Add some sparkle and flair with beads from the Mystic Jewelry Kit.
Supplies:

-Cardboard
-Paint
-Yard stick or long, straight stick from your yard
-Black yarn
-Pipe cleaners
-Embroidery floss
-Beads
-Pom poms
-Sequins
-Hole punch
-Scissors
-Hot glue gun (*ALWAYS have an adult help you use a hot glue gun!)
Steps:

1. On a large piece of cardboard, trace a variety of different-sized circles with a pencil. We used cups and bowls from our kitchen to trace our circles! Make sure that you have one that is much larger than the rest to be the sun. Choose a paint color for each planet and paint your circles. Once your paint has dried, carefully cut them out! (We used the following colors of Kid Made Modern paint for our planets: Lemon Zest for the Sun and Saturn, Poppy for Mars and Jupiter, Avocado for Venus, Pool for Earth and Uranus, Deep Sea for Neptune, and Onyx for Mercury!)


2. Create your sun! Use your largest circle to be the sun. To decorate the sun, we used a hole punch to punch holes around the edge of the circle. Tie one end of a piece of embroidery floss from your Arts and Crafts Library into one of the holes. Lace the string through the holes randomly, letting it cross back and forth over the sun as you go. Once you are finished, tie off the other end of the string and trim off the extra! We glued some of the yellow, orange and red marbled pom poms onto the sun with a hot glue gun. Finally, we used the pink and gold metallic pipe cleaners to create the sun’s rays. Put one end of each pipe cleaner through one of the holes you punched, loop in back up to meet the rest of the pipe cleaner and twist the ends together to hold it in place. You can then bend and twist your pipe cleaners to finish your sun!


3. Decorate your planets! We used a few different methods to decorate ours. For some (Earth and Neptune) we glued pom poms and sequins from the Arts and Crafts Library onto the cardboard. For others (Venus, and Mars) we punched holes around the edges and laced embroidery floss through the holes. You can also add beads to the string as you lace the string through! For the rest of our planets (Mercury, Jupiter, Saturn, and Uranus) we punched holes on the sides of the planets and poked the ends of pipe cleaners through them. Fold down the ends of the pipe cleaners on the back of the cardboard and secure with a bit of hot glue! Use longer pipe cleaners to create the rings around the planet Saturn! You can place beads on the pipe cleaners as well - we used beads from the Mystic Jewelry Kit here!


4. Next, you will create the bar where your planets will hang. We used an old yard stick as the bar, but you could also use a sturdy, straight stick from a tree in your yard! Use hot glue to glue the end of your black yarn to one end of your stick. Wrap the yarn around the stick carefully to cover the stick completely. Once you reach the other end, glue it in place and trim the yarn. Using hot glue, glue beads from the Mystic Jewelry Kit along the length of the stick. These beads add so much interest to the project! We loved the colors and sparkle. Cut one more, long piece of yarn and tie one end of it to each end of your stick. You will hang your project from this.

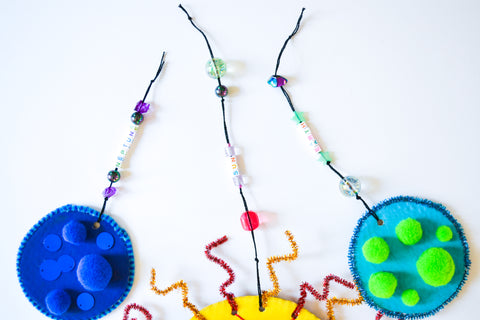
5. To prepare your planets to hang, cut a piece of black embroidery floss for each planet. We cut ours at different lengths, some shorter and some longer. Punch one hole at the top of each planet (if it doesn’t already have one!) and tie one end of the embroidery floss through the hole. Add beads to the string to decorate. We used more beads from the Mystic Jewelry Kit here and used the letter beads from the Arts and Crafts Library to spell out the name of each planet! You can tie a knot in your string in the place where you want beads to be to keep them in place.

6. Using your hot glue gun, glue the end of each string to your main bar. We glued them to the back of the bar. Start with the middle planet, Mars, and glue this in the center of your bar. You can then glue planets from Mars in either direction. This will help keep your planets more evenly spaced!
I have a trick I use to help me remember the order of the planets in our solar system! This kind of trick is called a mnemonic device - it’s a saying where each word starts with the same letter as the name of each of the planets. It goes “My Very Excellent Mother Just Served Us Nectarines!” The first letter of each word matches the planets in order - Mercury, Venus, Earth, Mars, Jupiter, Saturn, Uranus, and Neptune!
7. Hang it! You can hang your project using a small picture-hanging nail or removable hook!
Add a little STEAM
There are many ways to extend your learning with this project! Here are a few we love:
-Ask an adult to help you do some research about each of the planets and the sun! Take notes on interesting facts about each. Using a permanent marker, write your favorite fact about each on the back of the cardboard planets you created!
-Add some spacecraft to your project! Do some research to learn about different types of spacecraft and see if you can create one using cardboard and your craft supplies! Use the embroidery floss to add these spacecraft to your project.
-In reality, the planets in our solar system don’t sit in a straight line like the ones in our model. The planets revolve around the sun, moving in a circle called an orbit. Each planet also rotates, or spins around, as it moves! Put your engineering skills to the test - can you think of a way to hang your planets so that they can revolve or rotate? How could you make your model more like our REAL solar system?
This post is by Emily Limer from Making with Mommy! Follow her on Instagram for more kids craft and STEAM ideas!

***
Shop our Arts and Crafts Library and Mystic Jewelry Kit Here!


