
Spring Paper Flower Hanging DIY
Have you seen those dried flowers pressed between glass, often little stems of baby’s breath or white daises, framed and found in vintage shops? I’m sure you have, maybe you’ve even dried your own in a similar style, I always pause when I see these dried flower pieces and wonder who took the time to save them so delicately.
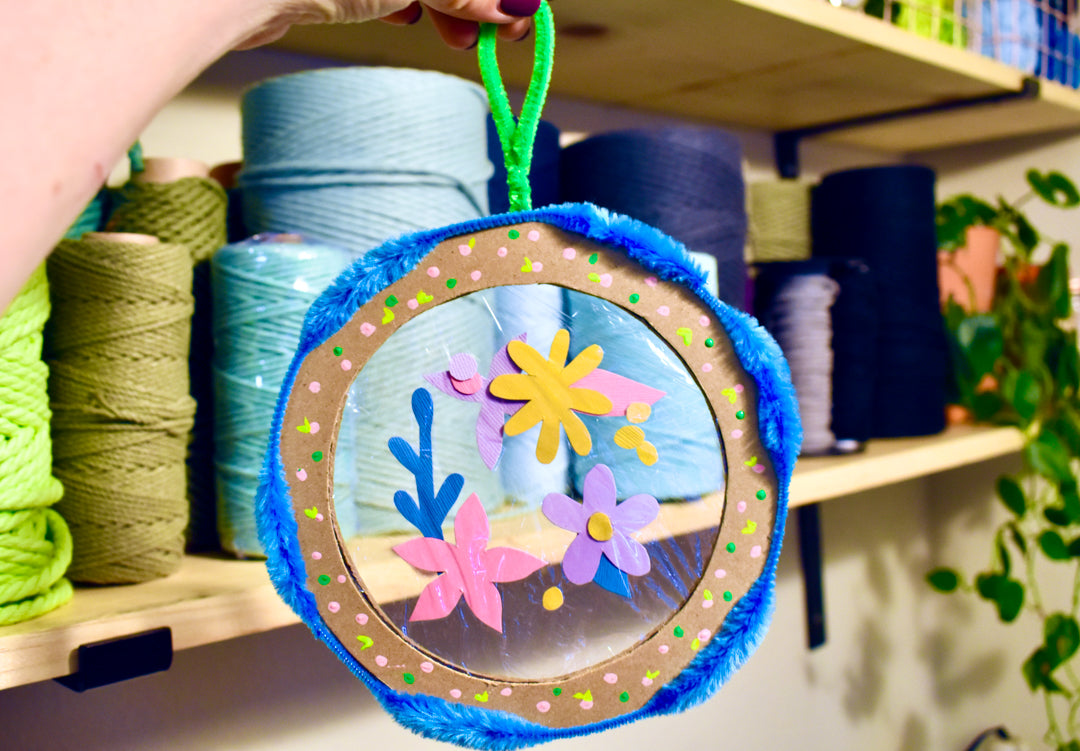
Well, this kid-friendly craft mimics the best part of those dried floral frames using paper flowers and recycled materials instead. With some additional materials like paint and fuzzy sticks, we’ll give this frame some extra pizazz and make it easy to hang to decorate for the Spring.
Materials Needed:
- Fuzzy Sticks
- Included in the Kid Made Modern Arts and Crafts Supply Library
- Kid Made Modern Washable Paint
- Paint Brushes
- Construction Paper in an assortment of colors
- Cardboard
- Two bowls in different sizes
- Marker
- Scissors
- Plastic Wrap

Instructions:
Step 1
Start by tracing your bowls on the cardboard, first with the largest bowl and then place the second bowl centered in the middle of the large, traced circle and trace it as well.


Step 2
Cut the circles out, cutting along the line of the largest circles first. Next, place the circle on your table top and hold the tip of your scissors in the middle, pull the cardboard up toward the handle of the scissors to create a hole in the center. Now that you’ve created a hole your scissor can fit in, cut the interior circle out and you should have two circular frames.

Step 3
Now it’s time to bust out your artist skills and draw some floral shapes on the construction paper. I used four different colors and drew a collection of different flower and leaf shapes, as well as some small circles to be flower centers are accent shapes.

Step 4
Cut each of your floral shapes out and assemble some together using glue dots, such as attaching flower shapes and leaves so they’ll stay connected.

Step 5
Line one cardboard circle with glue dots, placing them every 2” or so. Place a square of plastic wrap over the circle, pulling it tight and pushing it against the glue dots to secure it in place.


Step 6
Place your paper flowers on top of the plastic wrap, arranging them a composition you like; you can overlap them, fill the whole center or just place 1 special flower in the middle.

Step 7
Next, place a second square of plastic wrap on top and press the pieces together in the center so the plastic wrap seals the flowers in place.

Step 8
Line the second cardboard circle with glue dots, just as you did with the first, and place it on top of the first circle and plastic wrap. Now trim the additional plastic wrap off by cutting along the edge of the circles.


Step 9
It’s time to decorate your frame, attach 2 fuzzy sticks around the edge of the cardboard frame using glue dots. Next, paint a fun design along the entirety of the frame. I went with a polka dot and tiny leaf pattern, get creative to make your frame your own!


Step 10
Lastly, let’s attach an easy way to hang out new piece of art. Bend a fuzzy stick in half and twist the ends together to create a looped end and a point on the other. Put a glue dot on the pointed end and push in between the layers of cardboard and press to secure the glue dot against the cardboard.


And just like that you’ve made your own floral wall hanging!

I can’t decide if I like the original inspiration or the crafted version better, as much as I love natural florals, being able to make my own artwork in any color palette and be creative always makes me so happy! Hope this gives you and your kiddos some inspiration to craft for the Spring season!
About the Author:

Fiber artist and craft enthusiast, Tessa Anderstrom, is the owner of handmade shop Studio Jane which focuses on sustainably made home décor and handmade art. As an avid DIYer with a passion for learning new skills, Tessa enjoys sharing that knowledge with crafters of all ages.